SIGMA Team Documents
Your SIGMA shared drive
You should already have a portable USB drive with many of the shared files for the team. If you don’t have one, ask MB about it. These instructions are meant to help you set up synchronisation between your drive and the rest of the teams’ drives.
Organisation of the drive
Principally we’re avoiding premature optimisation by refusing to design a structure before we need it. Thus the main organisation principle here is to observe what structures emerge as part of our day-to-day work and what works well.
The drive is typically organised by name of the organisation and material within their collection. We try to keep things in tidy folders that are about the size of each task. MB generally uses the name of the organisation; JPA likes to use an ISIL (ISO 15511).
The files in the sub-directories may be named in all sorts of ways,
but the most important thing is that they stay in the right order,
which is generally the order in which they occurred in the archive.
If you want to change the order, prefixing numbers like
001-image-cool.jpg, 002-imageb.jpg, 003-image-another.jpg,
etc. can work well.
You can also use numbering to insert a inventory or description of the
files. That is, 000-inventory-and-description.md will come first.
Syncing your drive
MacOS users can install homebrew, update it, and then install the cask syncthing by opening a terminal and typing:
brew install homebrew/cask/syncthing
The other version of syncthing
The cask version of syncthing creates a nice status menu and can be made to start at boot. You can also use the vanilla version of syncthing by running that install in your terminal:
brew install syncthing
Then you can run syncthing by typing syncthing into the command
line, where you can see the logs and errors as they occur. Once
you’re comfortable with how syncthing works, you can also type brew services start syncthing to keep it running in the background.
With syncthing running either on the command line or background, navigate a browser to http://127.0.0.1:8384. This is the web interface for controlling syncthing.
You’ll need admin rights, but then you can run syncthing whenever you want from your “Applications” directory. You can change the settings to “Start at login”, if you like:
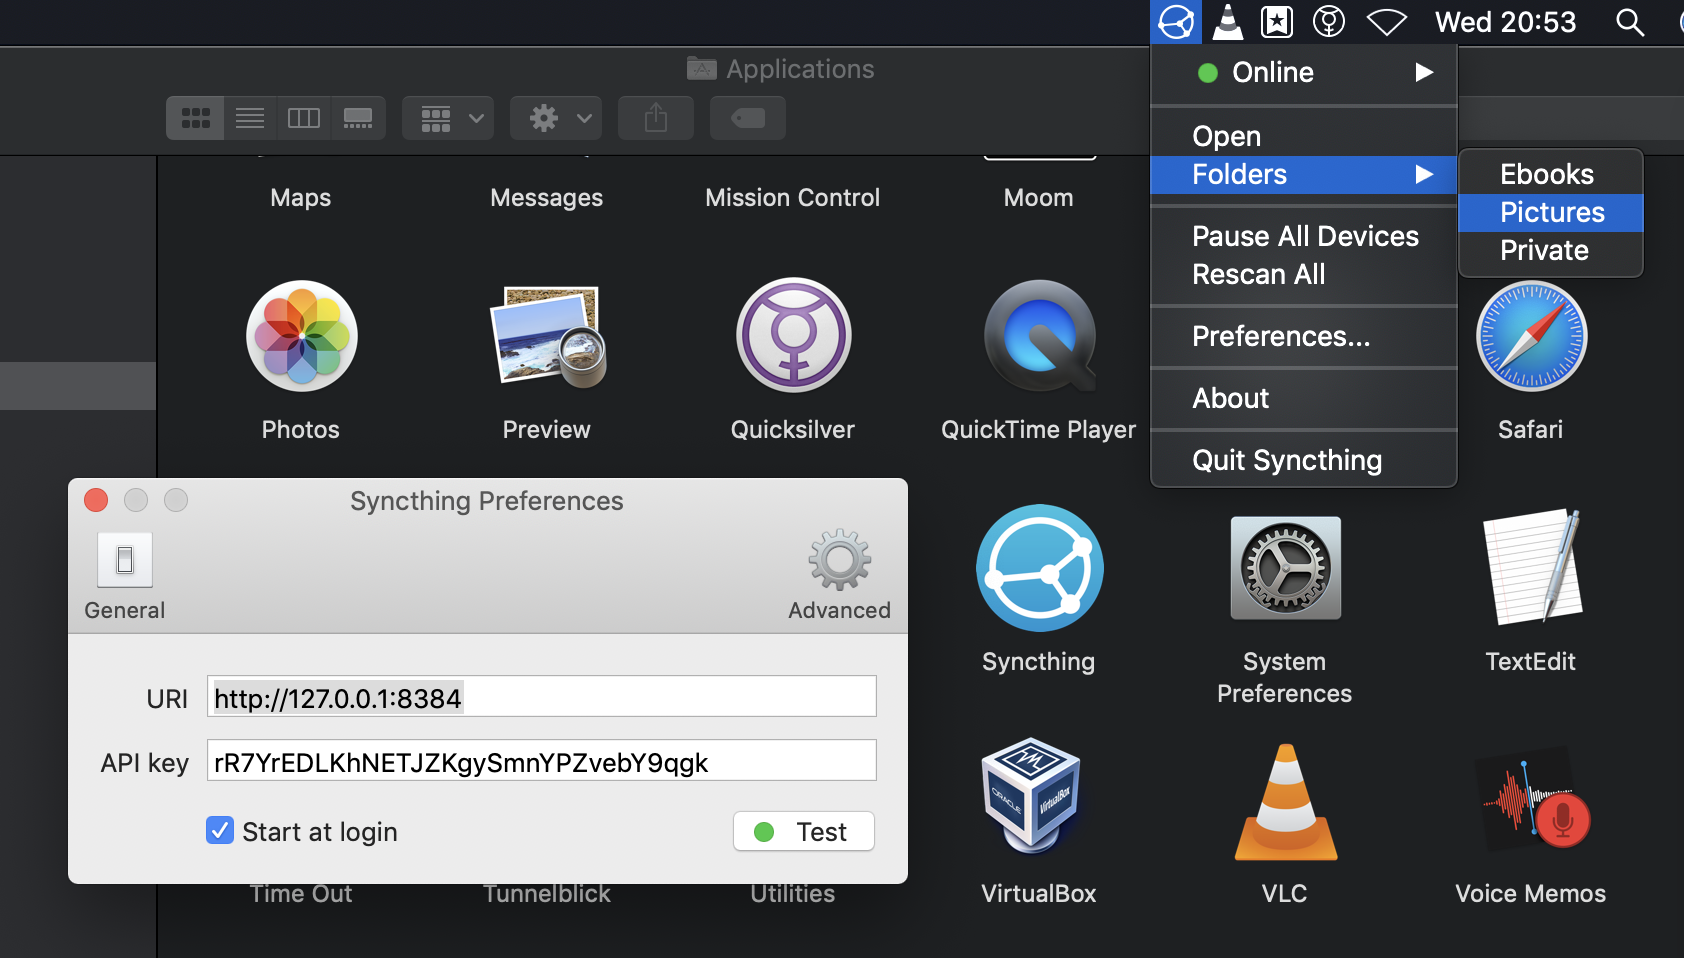
To access the settings, click on the menu bar icon and then “Open” to open a browser with the web interface.
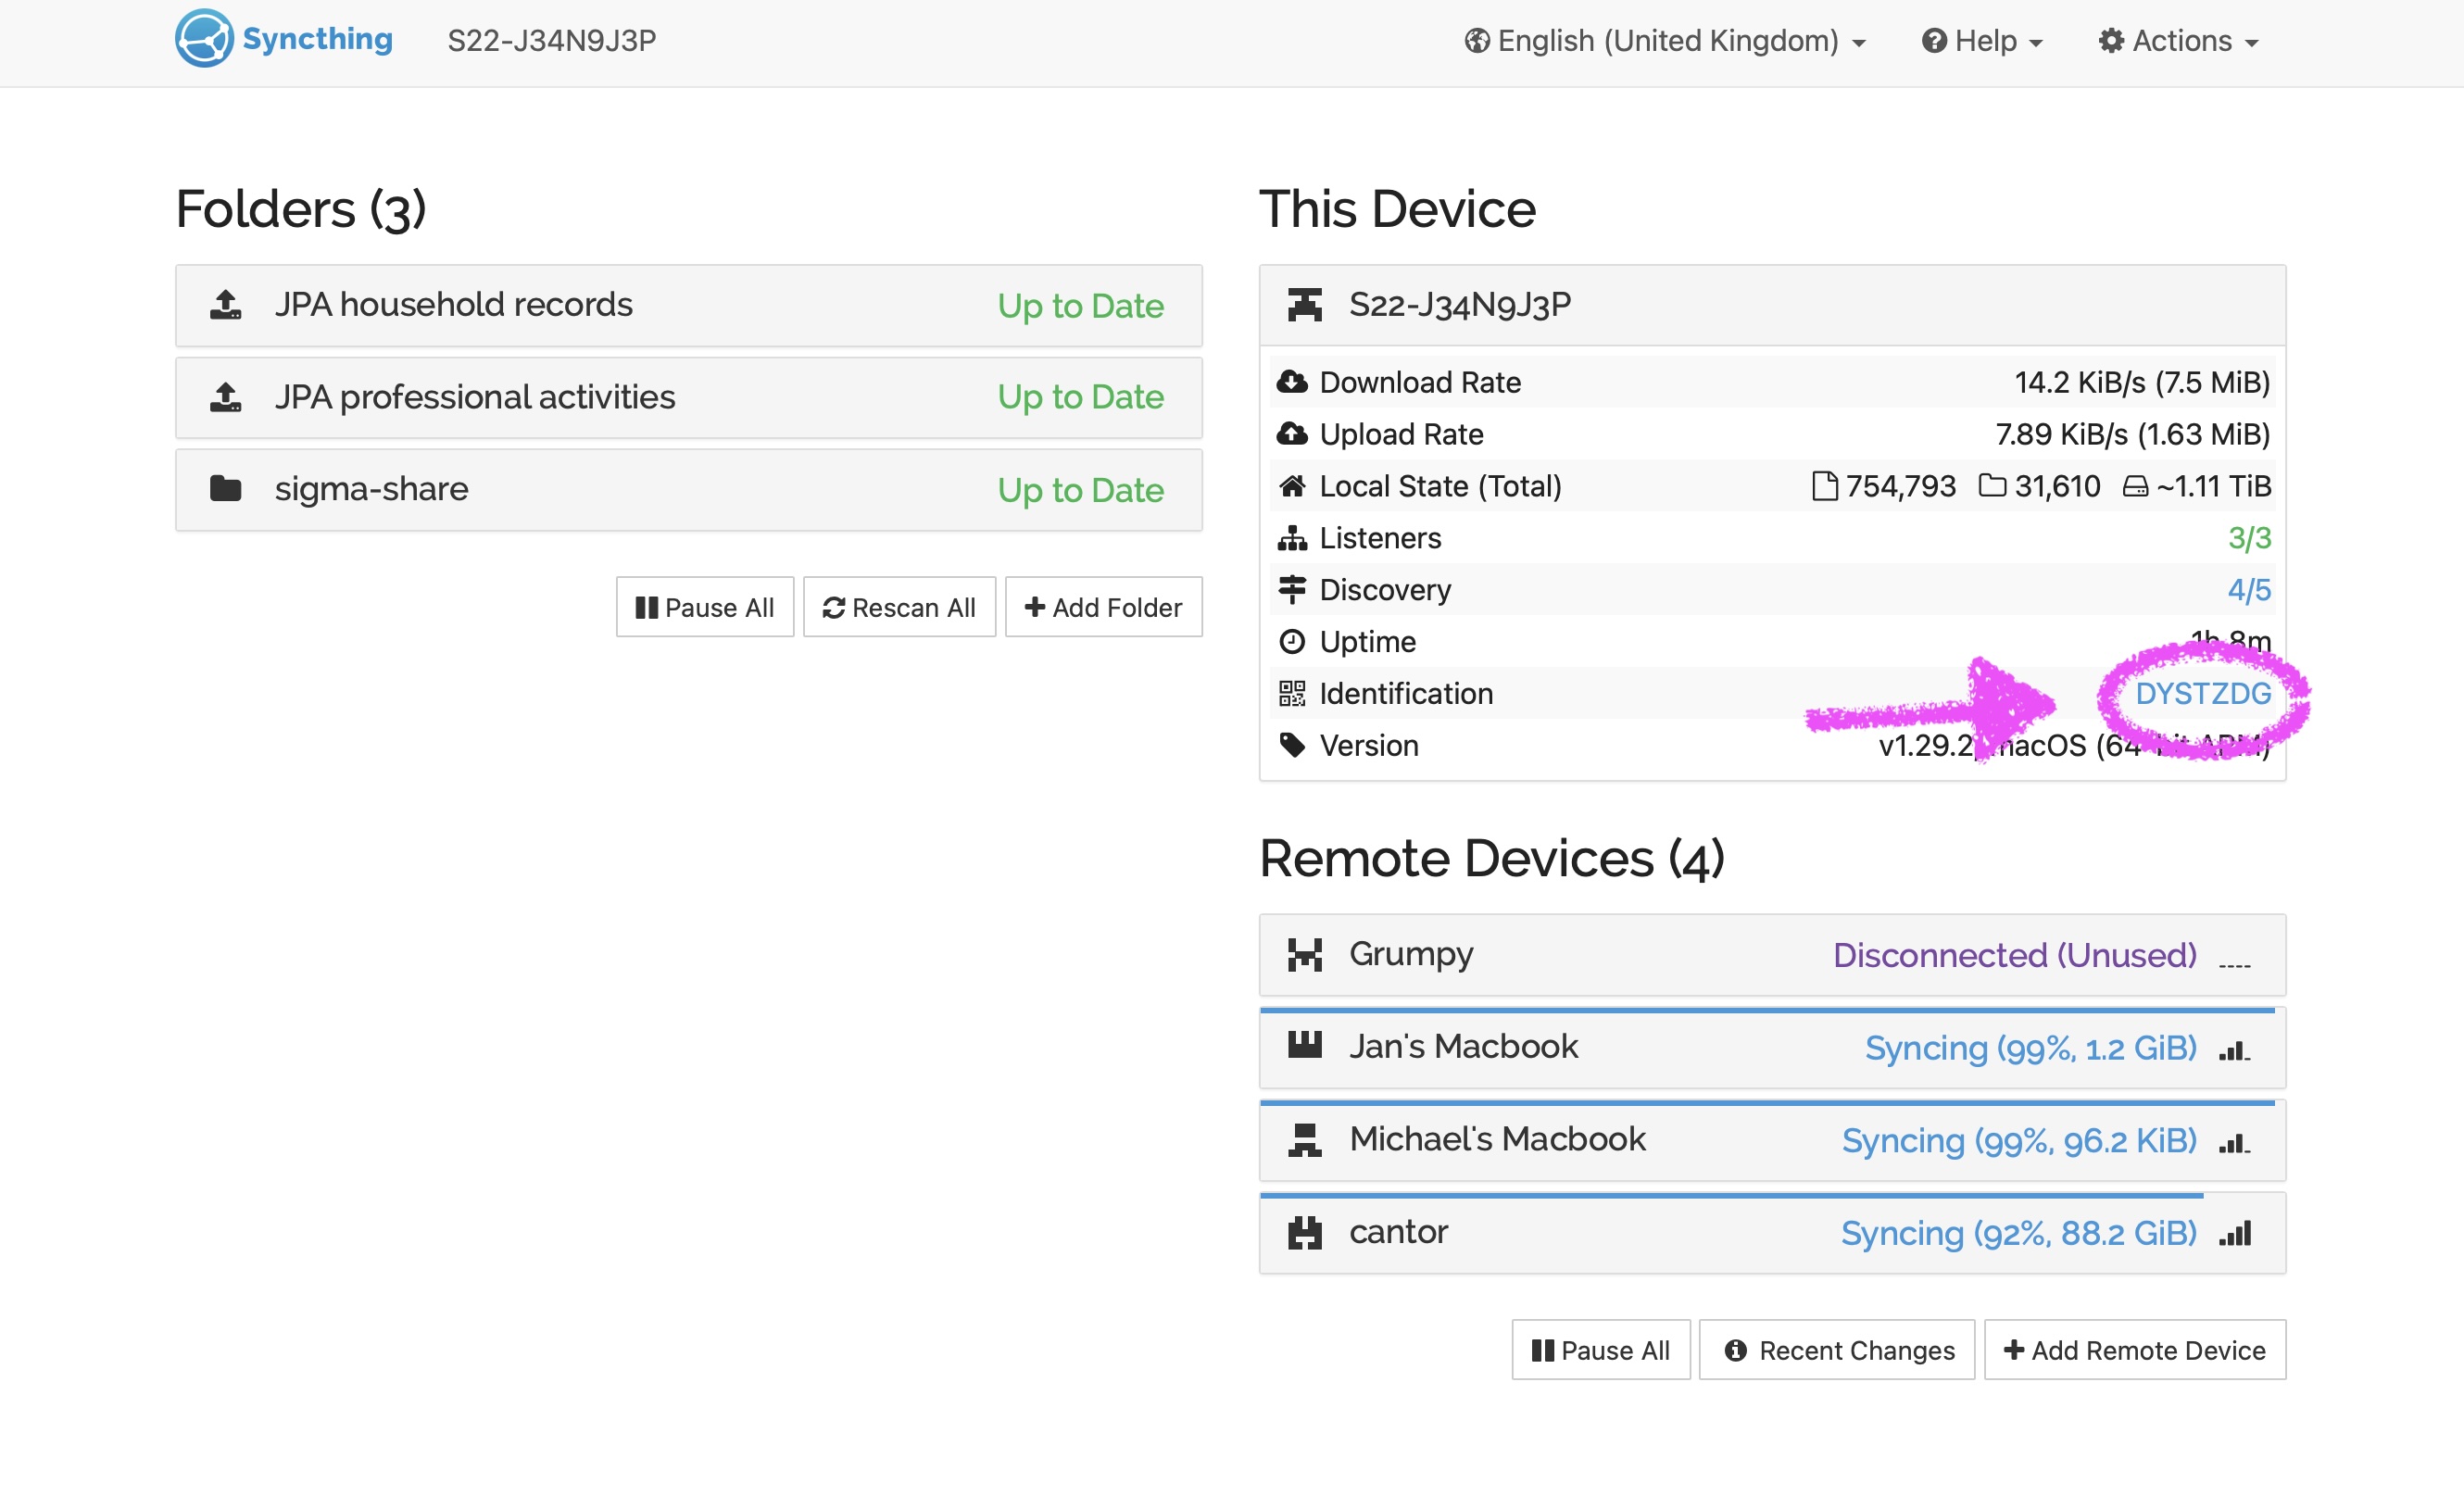
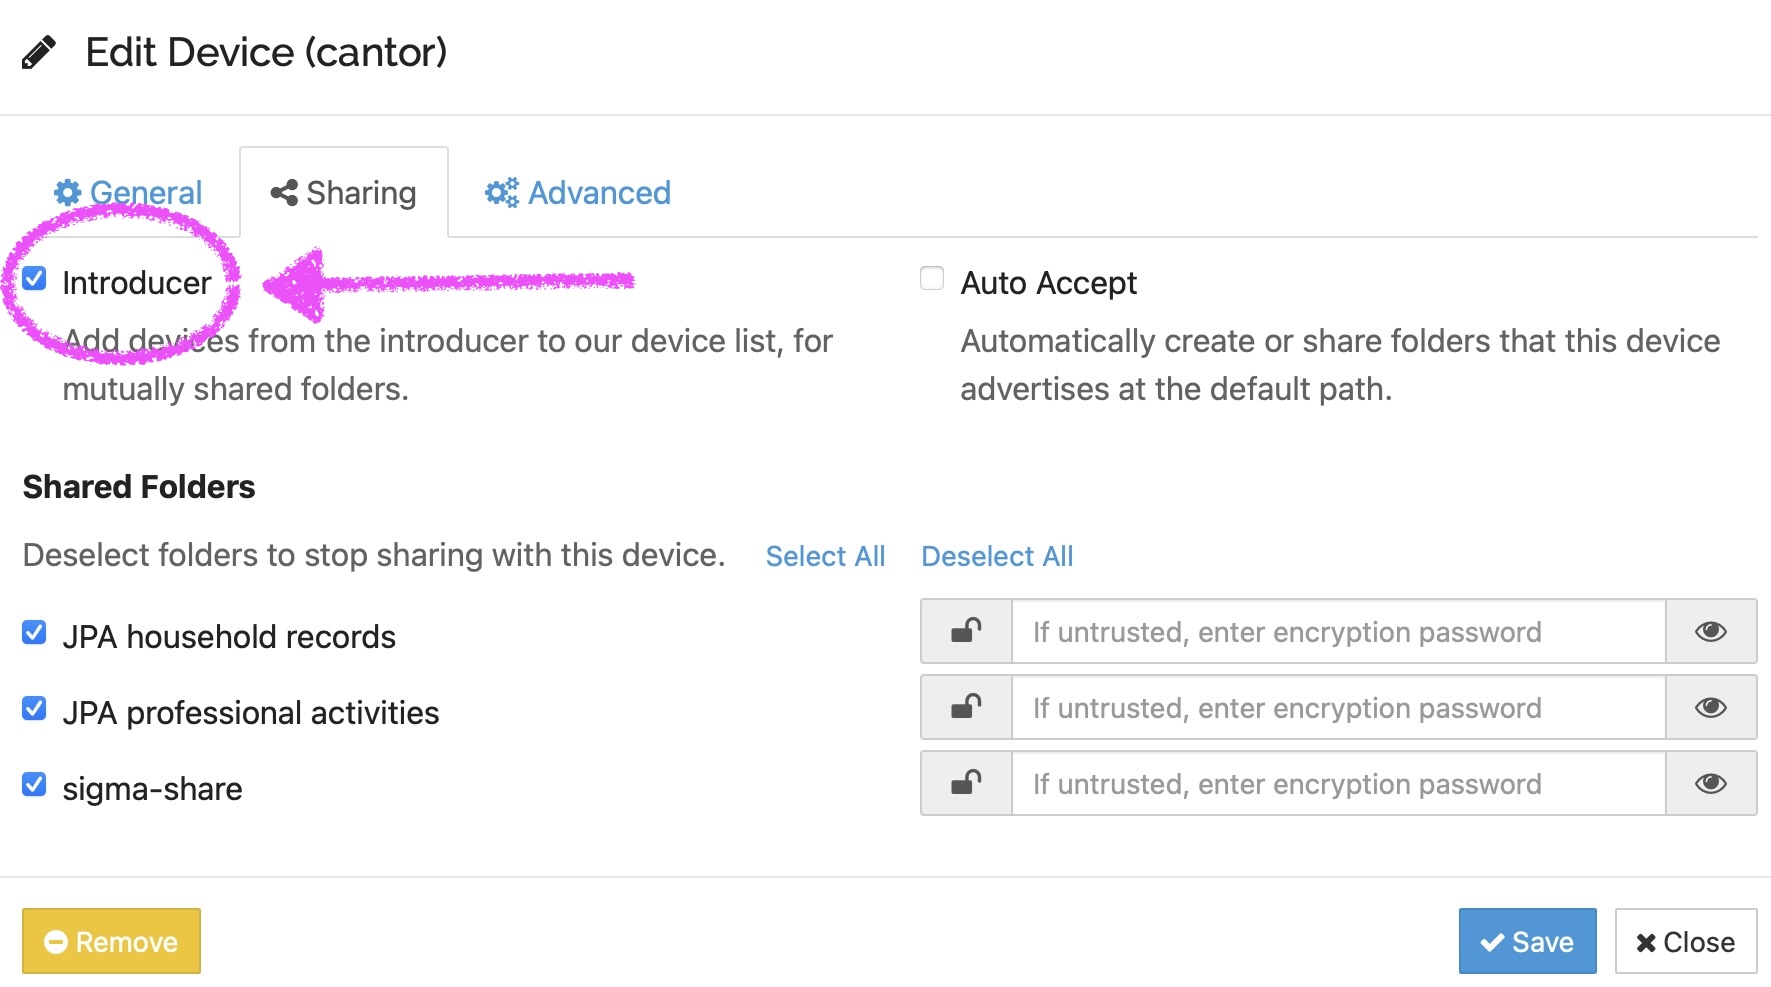
In the lower right, you can see the machines your instance of syncthing knows about. Ask J.P. for the device ID for the Raspberry Pi server named “cantor” on Teams, WhatsApp, Signal, email, or whatever. And while you’re at it, tell him your device ID. You can find yours by clicking on the shorter strong on the right called “Identification.” Both will be a long string of arbitrary numbers and letters, so you probably want it somewhere you can cut and paste from on your laptop. Once you have it “Add Remote Device” and insert the string for cantor. On the tab “Sharing”, check the box for “Introducer” and then click “Save.”
Assuming cantor isn’t down–sometimes it is–your computer should spot
it. J.P. will spot you on cantor’s end and share the “sigma-share”
folder with you. Once that happens, you will get a notification that
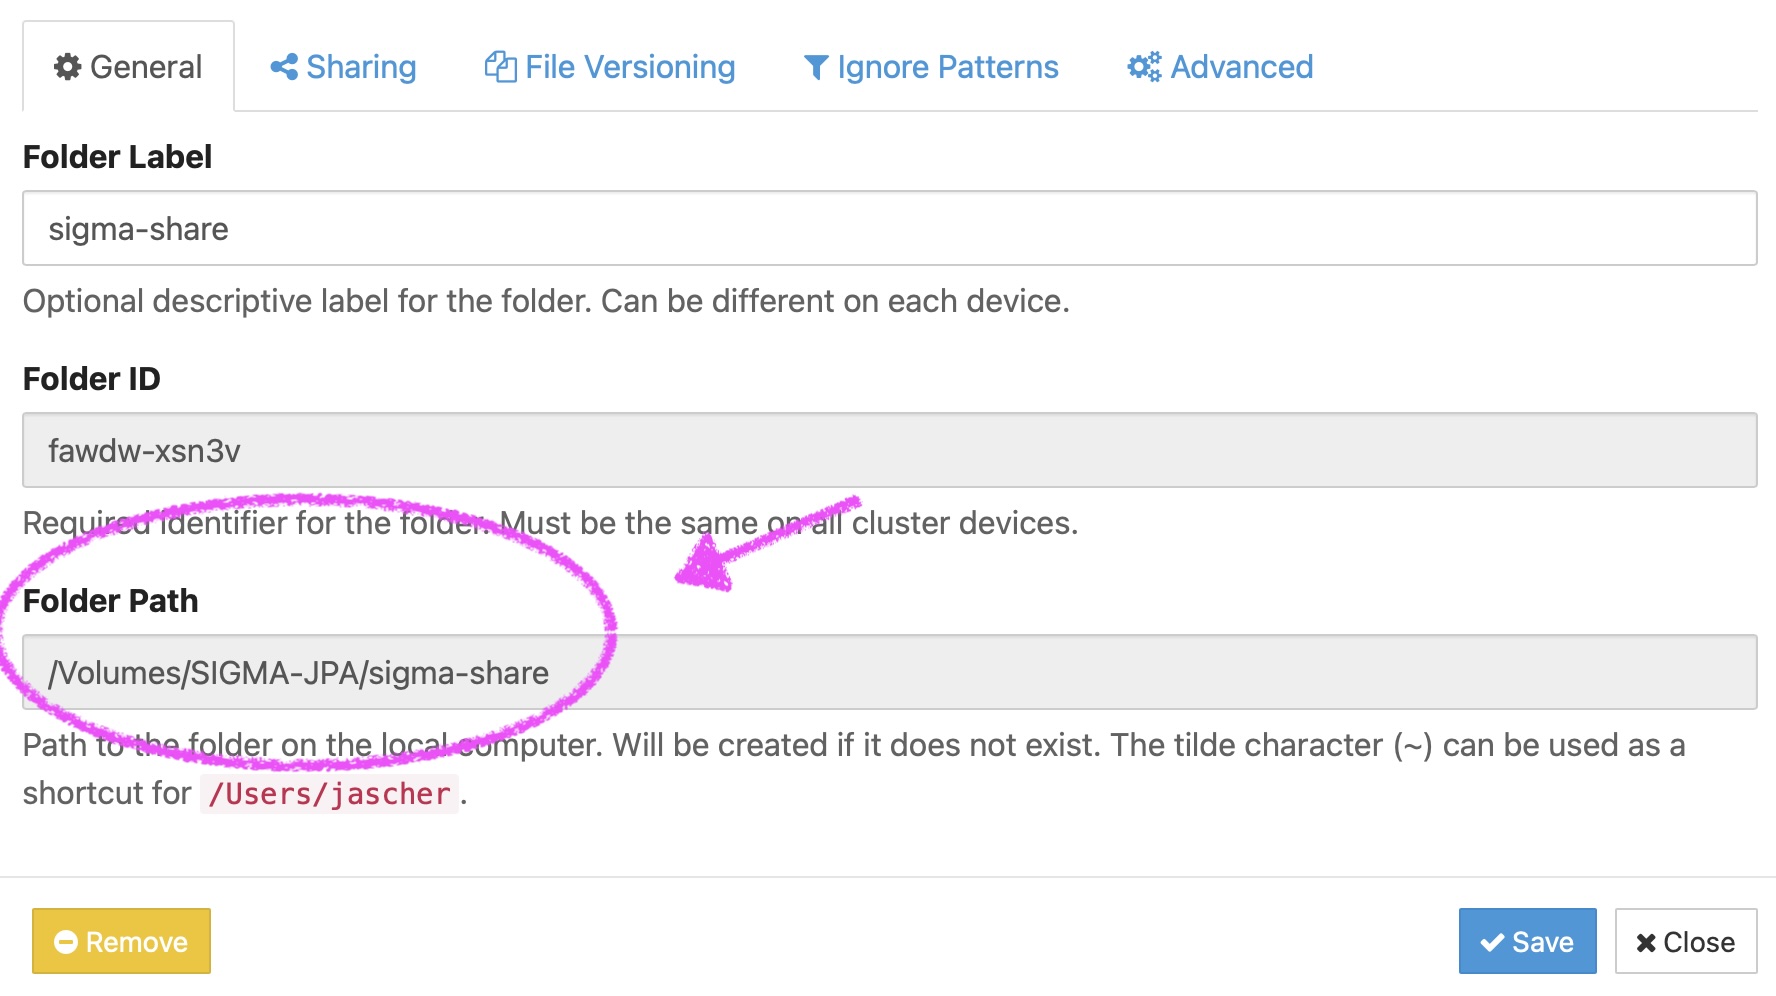
cantor is sharing a folder. When you accept it, make sure to change the folder path to
your SIGMA drive, e.g. /Volumes/SIGMA-XX/sigma-share where XX are
your initials if J.P. set up your initial drive. This will save you
some time because most of the files are already there.
Also please add ignore patterns for computer-specific files to the
“Ignore Patterns” tab. The .DS_Store records the icon location for
your files and .Trashes is your local trash. These files frequently
cause conflicts in syncing. When you trash something on the synced
drive it will disappear on other peoples’ drives.
(?d).DS_Store
(?d).Trashes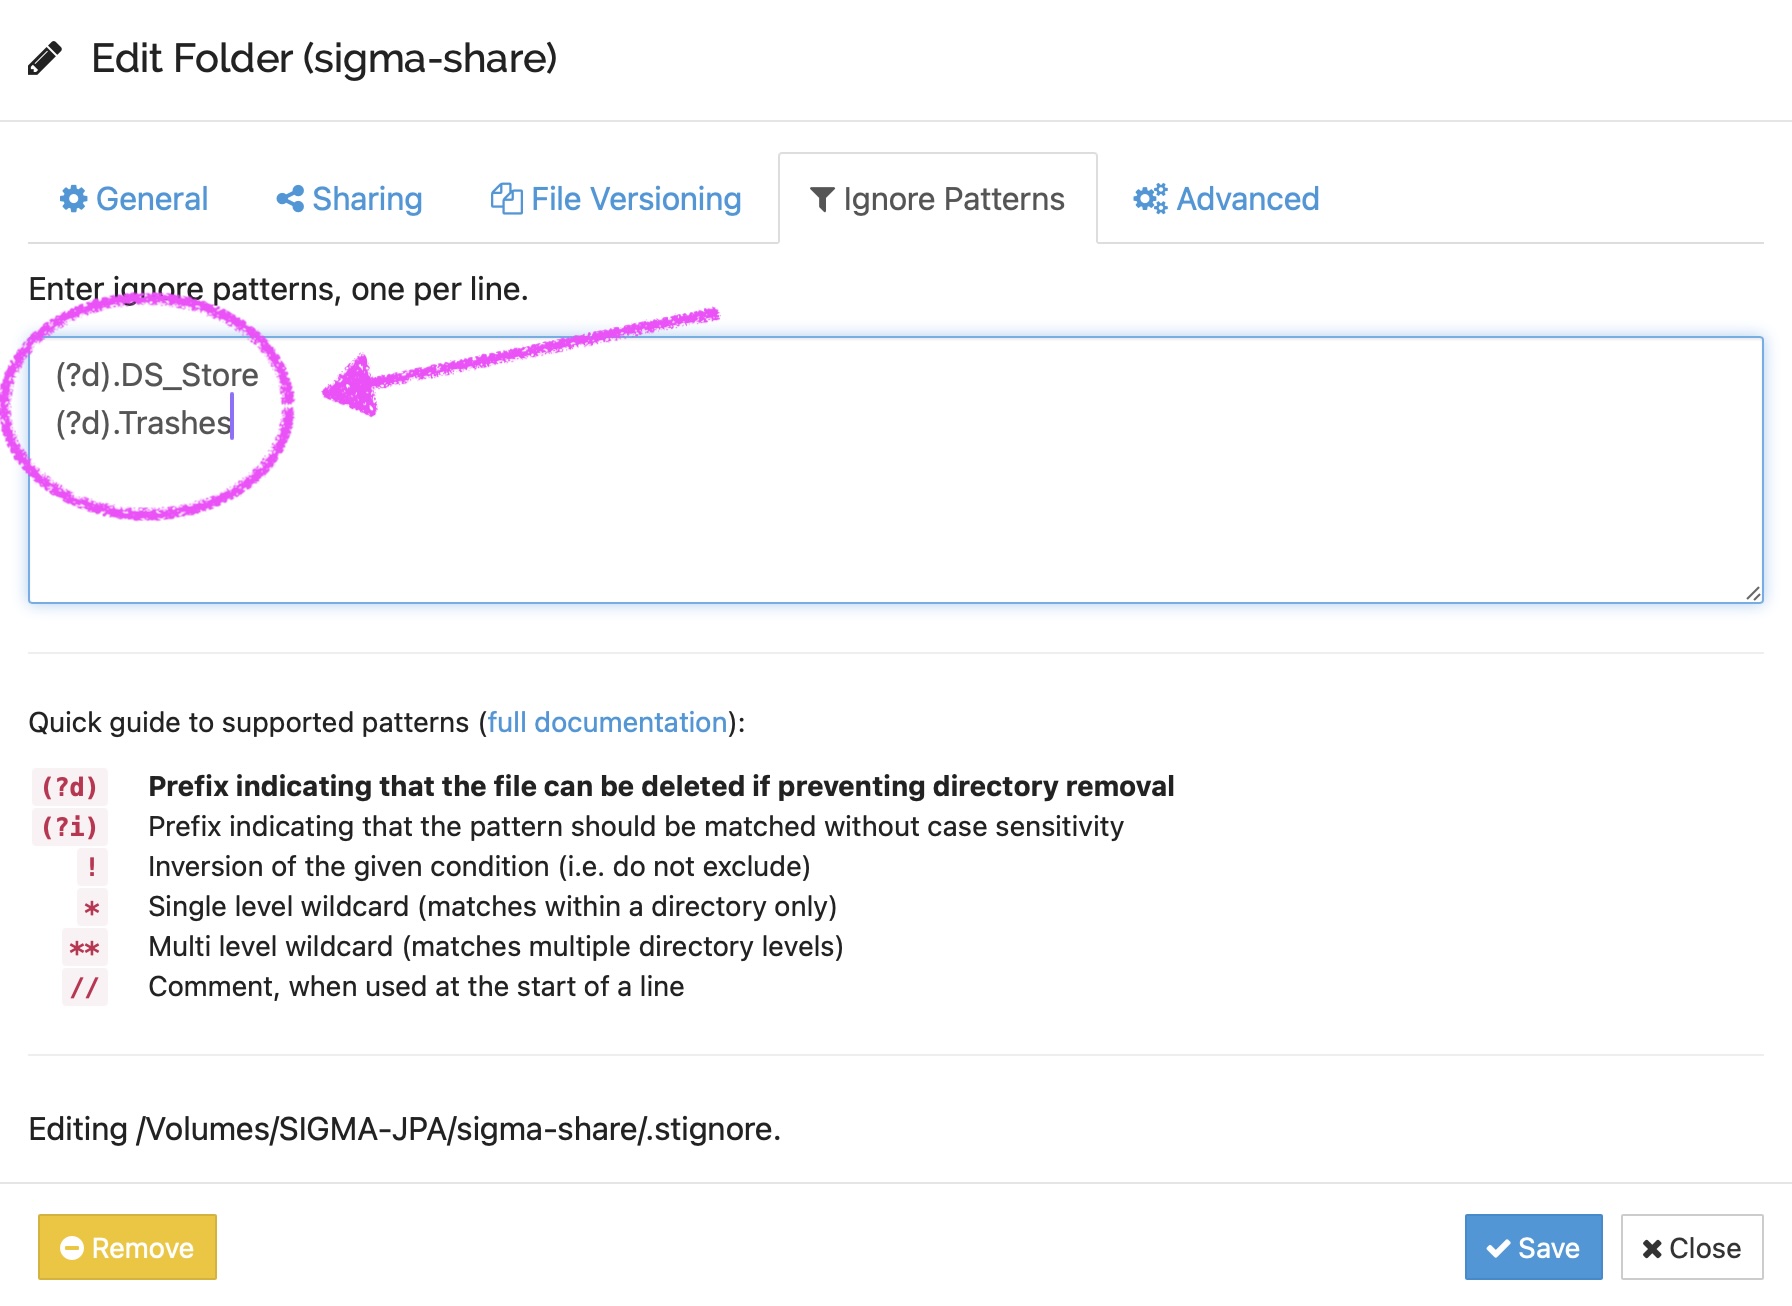
After saving your changes, the web interface will tell you that it is scanning your drive, then syncing, then updating. It’s likely things will be somewhat out of sync, so you may have to “override local changes” before the sync is totally ready. As long as you haven’t made any changes, this is a good idea for the initial sync.
Using rsync for the initial sync
To setup a new drive from an existing drive, rsync is the quickest. MacOS users can install homebrew, update it,
and then install rsync with:
brew install rsync
Why not use Apple’s rsync?
The software rsync is fast and powerful, so it’s important to be careful using it. Generally you can do a dry run of what changes it will make to make sure it looks correct. And after the dry run, you can go ahead and do the sync. I use this to keep manual backups for MacOS formatted disks:
/opt/homebrew/bin/rsync -avhAXHUNP --delete $HOME/Documents/Professional /Volumes/Butler --dry-run
This will do a dry run of a copy the entire contents of the
Professional directory into a directory named Professional on the
drive named Butler, respecting various attributes. If you want to
understand the various flags, run man rsync and read about them.
Note --delete which says to delete any files on the destination not
on the source and --dry-run which prevents the tool from actually
changing any files. It should generate a long list of files that it
would plan to change. A small change should only be a few files–and
if you see lots of unexpected files planned to be deleted–there might
be something wrong.
If all looks good, I run the command again, but without --dry-run.
So, if you have two SIGMA share drives, I’d use this command:
/opt/homebrew/bin/rsync -avhAXHUNP /Volumes/SIGMA-XX/sigma-share /Volumes/SIGMA-YY --dry-run
You should replace XX and YY with the source and destination drive
initials. If all goes well, this will copy all of sigma-share from
the XX drive to the YY drive. I omit the delete here because I don’t
expect that anything would be deleted.
If it looks right, run the command again without --dry-run and let
it finish.
Using rsync to update cantor or across platforms
Your local machine needs to know how to read the file system for each drive connected to it to synchronise files. There exist some tools to do this, but you can also have a virtual machine running the other platform.
I have UTM with Ubuntu Server Linux to
update cantor. You start the virtual machine, attach the
ext4-formatted drive, scan for it using fdisk -l, and then mount it.
I have setup
Samba
to share the directory and I connect to the virtual machine locally at
192.168.64.2 in MacOS Finder. Then I can just use rsync between the
MacOS volume and the Samba-shared ext4-formatted volume with a
Terminal running in MacOS.
This would presumably work for Windows or any other operating system for which we need to make an image.
Provincializing Modern Mathematics Transactions 16 April 2025
Provincializing Modern Mathematics Transactions for 15–16 April 2025Meeting programme: https://sigma.mathsworlds.org/activities/brics-icms/provincializing/ TUESDAY 15 APRIL 9:15-9:30 - Welcome The name and conceit for this event comes from Dipesh Chakrabarty’s book Provincializing Europe, which expands on the 1992 article ‘Postcoloniality and the Artifice of History’ in Representations. These works point out the focalization of scholarship, especially historical scholarship, on Europe as the universalist centre of modernity. Similarly, the works out point that current research requires non-European historical scholarship to consider Europe, but not vice versa.
April 16, 2025
Provincializing Modern Mathematics Edit Link: If you’re accessing this through the reading-only link, use this link to edit: https://cryptpad.fr/code/#/2/code/edit/6ptz1ZXNEEtF6hsSY7eJu3U7/ Meeting programme: https://sigma.mathsworlds.org/activities/brics-icms/provincializing/ [TOC] How to Contribute Please type notes here or make friends with someone already typing. Don’t worry too much about spelling, organization, etc., we’ll clean them up afterward. We are using plain text / Markdown to reduce bandwidth requirements and for simplicity. If you are not a Markdown user, just type words and they will look and work fine!